We promised to protect you from cumbersome configuration and installation work. Therefore, you can find below a link to an initial project prepared with the cloud IDE Codenvy for you.
Start Cloud IDE
As you might have guessed, all the changes you are doing in the cloud IDE are volatile and will be lost after closing the browser. If you want, you can sign up to Codenvy which allows you to persist the project in your own dedicated workspace. If you don’t want to sign up, don’t worry: throughout the book we provide links that allow you to start an IDE in the needed state.
Though you can use this project as a black box, we want to provide some informations about the project setup to deepen your understanding.
2.1 Project Infrastructure
First, we used Maven to create and configure the project. Maven is a technology that supports the creation and deployment of Java EE applications on various application servers and allows them to be integrated in virtually any IDE. Maven is a general configuration management tool for all Java-based projects and for Java EE projects in particular. The motivation for creating Maven arose from the observation that every Java project to date had been accompanied by a large number of custom build scripts and that the intelligibility of each project therefore had to be addressed separately. A lack of transparency and standardization rendered the intelligibility of project structure minimal. Maven standardized the way in which Java projects were created and executed. In addition to providing a system by which the components of the project could be defined, it simplified the publication of project information and enabled the uncomplicated sharing of JAR files between multiple projects.
The Maven system offers users the opportunity to define templates for particular types of Java projects. The generation of a template for a company project, for example, enables a higher degree of project standardization. These templates are known in Maven as archetypes. Corresponding archetypes also exist for Java EE 7 applications. A pared down, “bare essentials” archetype for Java EE 7 projects has been developed by Adam Bien, whose credentials include membership of the Java Community Processes expert panel that worked on the Java EE 7 specification[1]. We used his template to generate an initial Maven project configuration and structure for our application and made some minor changes to it.
Second, we configured the project in the way that WildFly 8.2.0 is used as our application server. In general, it is possible to configure arbitrary execution environments in Codenvy since Docker is used internally. We decided to use WildFly because of its high practical relevance.
2.2 Project Structure
If you browse the project with the project explorer you can see a lean directory structure (see Tab. 2-1).
| Directoy | Description |
| src\main\java | Contains the package structure and the corresponding Java classes. |
| src\main\webapp | Contains all views and stylesheets concerning the web layer of the application. |
| src\main\webapp\WEB-INF | Contains configuration files. |
| src\main\test | Contains the package structure and the corresponding Java classes for test cases. |
Tab. 2-1 Directory structure of the initial Maven project.
Currently, there are four files stored in the project that will be explained below.
First, the configuration of the Maven project can be found in the root directory of the project and is stored in the file pom.xml[2]. All information that has been entered thus far in interactive mode will be stored there, as will a number of values provided by the archetype. The file is nevertheless very compact (see Listing 2-1).
<project xmlns="http://maven.apache.org/POM/4.0.0" xmlns:xsi="http://www.w3.org/2001/XMLSchema-instance"
         xsi:schemaLocation="http://maven.apache.org/POM/4.0.0 http://maven.apache.org/xsd/maven-4.0.0.xsd">
    <modelVersion>4.0.0</modelVersion>
    <groupId>press.turngeek</groupId>
    <artifactId>my-campaign</artifactId>
    <version>1.0-SNAPSHOT</version>
    <packaging>war</packaging>
    <dependencies>
        <dependency>
            <groupId>javax</groupId>
            <artifactId>javaee-api</artifactId>
            <version>7.0</version>
            <scope>provided</scope>
        </dependency>
    </dependencies>
    <build>
        <finalName>${project.artifactId}</finalName>
    </build>
    <properties>
        <maven.compiler.source>1.7</maven.compiler.source>
        <maven.compiler.target>1.7</maven.compiler.target>
        <failOnMissingWebXml>false</failOnMissingWebXml>
        <project.build.sourceEncoding>UTF-8</project.build.sourceEncoding>
    </properties>
</project>
Listing 2-1 Initial Maven project configuration file pom.xml.
Essentially, our pom.xml file states that a web archive is to be created from the project (tag <packaging>), that the name of the web archive (and therefore also the web application) is my-campaign (tag <finalName>), that our project is dependent on the Java EE 7 API (tag <dependency>) and that Java 7 should be used (tag <maven.compiler.source> or <maven.compiler.target>)[3]. Over the course of this Cloud Tutrorial, we will continue to add to the file pom.xml and to integrate additional dependencies to libraries into the project.
Second, we provided a first JSF view index.xhtml in the directory srcmainwebapp as shown in Listing 2-2. As you can see, Facelets describe views of a web application similar to HTML. Tags of the view declaration that belong to a JSF namespace are rendered on the server-side into HTML[4].
<!DOCTYPE html>
<html xmlns="http://www.w3.org/1999/xhtml"
        xmlns:h="http://xmlns.jcp.org/jsf/html">
    <h:head>
        <title>Tutorial Java EE 7</title>
    </h:head>
    <h:body>
        <h1>Java EE 7: Welcome to our Cloud Tutorial!</h1>
    </h:body>
</html>
Listing 2-2 Facelet index.xhtml
Third, in order for the application server to recognize that it is dealing with a JSF application, we must add the configuration file faces-config.xml (as shown in Listing 2-3) to the directory srcmainwebappWEB-INF.
<?xml version="1.0" encoding="UTF-8"?>
<faces-config version="2.2"
    xmlns="http://xmlns.jcp.org/xml/ns/javaee"
    xmlns:xsi="http://www.w3.org/2001/XMLSchema-instance"
    xsi:schemaLocation="http://xmlns.jcp.org/xml/ns/javaee
        http://xmlns.jcp.org/xml/ns/javaee/web-facesconfig_2_2.xsd">
</faces-config>
Listing 2-3 Configuration file faces-config.xml
This is not the only way to enable JSF for the application in the application server. For the moment, however, it is the easiest, since this file will also be required to internationalize our application in the following chapters.
Finally, we added an index.html file to the directory srcmainwebapp as shown in Listing 2-4. This is the entry page for our web application and realizes a forward to our Facelet.
<!DOCTYPE html>
<html>
<head>
    <meta http-equiv="Refresh" content="0; URL=index.jsf">
</head>
</html>
Listing 2-4 HTML page index.html
2.3 Running the Project
To start the application server, we’ll click on the ‘Run‘ submenu you’ll find under the main menu ‘Run’. In the console log in the bottom part of the screen you will see the log entries of the server. After starting up our server the cloud IDE will deploy our application, which consists of an empty WAR file[5] (short for web archive) for the time being.
After the deployment in the console log, you will find a blue colored link labeled with “Application:” as shown in Figure 2-1. Press this link to start the deployed application[6]. Please memorize this procedure as you’ll repeat it a lot of times throughout this book.
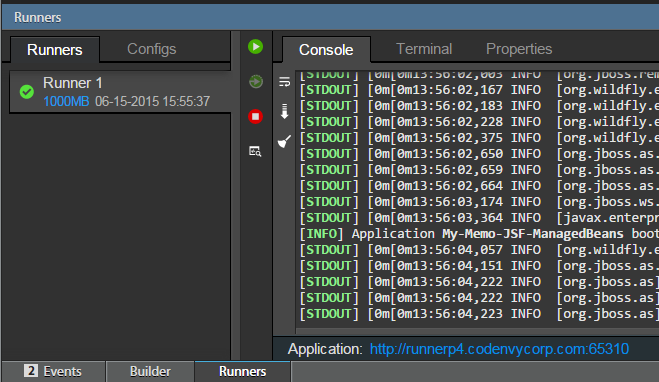
Fig. 2-1 Screenshot of the application starting link.
After clicking on the link the browser should prompt the message Java EE 7: Welcome to our Cloud Tutorial!.
As you can see, currently JSF generates a static HTML page containing a welcome text. Now that we can handle with the infrastructure, we can develop the target application step by step in the following chapters.
Discussion
Use the message board below to give the authors your feedback or to discuss this page’s topic with other readers (in English please!). Please don’t expect the authors to answer directly, but they might update the content of this site according to your feedback.
- see http://www.adam-bien.com/roller/abien/entry/setting_up_java_ee_7 and https://github.com/AdamBien/javaee7-essentials-archetype ↵
- Do not rename this file – Maven will search for a configuration file with this name each time the program is started. ↵
- Currently, the Codenvy editor does not support Java 8. ↵
- Be careful in the future, Codenvy does not provide a special menu item for xhtml files. So please use the generic New -> File item and enter the complete filename including the suffix .xhtml. ↵
- We're linking here to the old Java EE 6 tutorial as we think the explanation for WAR files is better there than in the newer Java EE 7 tutorial ↵
- Be careful, sometimes the link appears before the application is deployed to the server. ↵