Now we can return to our implementation and focus our attention on the rest of our use cases. To better understand their implementation, however, we recommend to take another look back at the input screen and the processing logic of the corresponding use cases before taking any practical steps. After that, you can continue to work in your own Codenvy workspace or you can use the following project state in a temporary workspace.
My-Campaign after Chapter 6 (First Use Case)
8.1 Editing Campaigns and Creating New Campaigns
The use cases Edit campaigns and Create new campaign have the same input screen and can therefore be managed with the same controller class. The only difference between the two use cases is that the first case involves the editing of the existing Campaign object, which means that the current values of the properties must be displayed in the input screen. If a new campaign is being set up, a new Campaign object must be created and its properties set with new values via the input screen. Furthermore, we must manage the processing mode that determines whether a new campaign should be created or an existing campaign edited. The management of the Campaign object and the processing mode is implemented in the class CampaignProducer (see Listing 8-1).
The CampaignProducer Class
package press.turngeek.mycampaign.data;

import press.turngeek.mycampaign.model.Campaign;
import javax.enterprise.context.SessionScoped;
import javax.inject.Named;
import java.io.Serializable;

@SessionScoped
@Named
public class CampaignProducer implements Serializable {
	private static final long serialVersionUID = -1828660647917534556L;

	private enum Mode {
		EDIT, ADD
	}
	private Campaign campaign;
	private Mode mode;

	public Campaign getSelectedCampaign() {
		return campaign;
	}
	public void setSelectedCampaign(Campaign campaign) {
		this.campaign = campaign;
	}
	public boolean isAddMode() {
		return mode == Mode.ADD;
	}
	public void prepareAddCampaign() {
		this.campaign = new Campaign();
		this.mode = Mode.ADD;
	}
	public void prepareEditCampaign(Campaign campaign) {
		this.campaign = campaign;
		this.mode = Mode.EDIT;
	}
}
Listing 8-1 CampaignProducer class
The processing mode is determined via an inner enumeration type (enum Mode). It can take the values EDIT or ADD. For this reason, alongside the attribute of type Campaign, the class also possesses an attribute of the type CampaignProducer.Mode.
An object of the class can be injected in a controller bean, making its data is available for the whole session. The controller can carry out the initialization of the bean depending on the current processing mode either via the method prepareAddCampaign or the method prepareEditCampaign. In the first case, a new Campaign object is created; in the second case, the object to be edited is passed. The rest of the getter and setter methods enable the attributes of the bean to be accessed.
The use case controller class EditCampaignController (see Listing 8-2) uses both the class CampaignProducer and the class CampaignListProducer, which manages our example data. This is necessary because new or edited campaigns must be added to the list of campaigns. It’s at this point that dependency injection comes into play. We declare an attribute of the type CampaignListProducer and an attribute of the type CampaignProducer in the controller class and and add the annotation @Inject to each. At runtime, the application server will now ensure that we have access to the bean via the declared variables. Since the context is set to @SessionScoped in both classes, we can be sure that all controller beans of the same user session are accessing the same bean.
The EditCampaignController Class
package press.turngeek.mycampaign.controller;

import press.turngeek.mycampaign.data.CampaignListProducer;
import press.turngeek.mycampaign.data.CampaignProducer;
import javax.enterprise.context.SessionScoped;
import javax.inject.Inject;
import javax.inject.Named;
import java.io.Serializable;

@SessionScoped
@Named
public class EditCampaignController implements Serializable {
	private static final long serialVersionUID = 2815796004558360299L;

	@Inject
	private CampaignListProducer campaignListProducer;
	@Inject
	private CampaignProducer campaignProducer;

	public String doSave() {
		if (campaignProducer.isAddMode()) {
			campaignListProducer.getCampaigns().add(
					campaignProducer.getSelectedCampaign());
		}
		return Pages.LIST_CAMPAIGNS;
	}
	public String doCancel() {
		return Pages.LIST_CAMPAIGNS;
	}
}
Listing 8-2 EditCampaignController class
Our controller classes contain two methods for controlling the flow. On the one hand, after editing or creating a campaign, we must be able to save it. This is accomplished by the doSave method. The logic of the method must take the current mode into account. If we are editing an existing campaign, there is nothing more to be done. However, if a new campaign is created, this must be admitted to the list of campaigns via the available ListCampaignProducer bean. In both cases, the user is redirected to the view LIST_CAMPAIGNS afterwards.
The option to cancel the process is also provided for. This is accomplished by the method doCancel. Here, all we need to is to navigate back to the view campaignList.
The editCampaign.xhtml Facelet
If we look at the layouts of the input screens, we see that a tab panel was provided. In the layout, we have arranged the general campaign data and the bank account details in different tabs. However, we have not yet talked about how such a component would work – and we would not find it in the JSF standard, even if we wanted to! This is a typical motive for using an additional JSF library. We will demonstrate the use of PrimeFaces for this purpose in chapter 10. For the moment, we’ll do without tabs and represent the two sets of data one under the other in two grids (tag <h:panelGrid>). As for every other Facelet of the application, we also require a number of texts, which will be displayed on the page according to the language preferences set in the browser. We will modify the properties file messages_en.properties with the following input:
# editCampaign.xhtml
editCampaign.add_new_campaign=Add a new campaign
editCampaign.edit_campaign=Edit campaign
editCampaign.general=General
editCampaign.name=Name
editCampaign.campaign_name_validation=The name of a campaign must be at least 4 and max. 30 characters long.
editCampaign.name_of_the_campaign=Name of the campaign
editCampaign.target_amount=Target amount
editCampaign.target_amount_validation=The target amount for the campaign must be at least 10 Euros.
editCampaign.donation_amount=Donation amount
editCampaign.donation_amount_validation=The donation amount must be at least 1 Euro.
editCampaign.bank_account=Bank account
editCampaign.iban=IBAN
editCampaign.name_of_bank=Name of Bank
editCampaign.save=Save
editCampaign.cancel=Cancel
In addition, we will add the following lines to the file messages_de.properties:
# editCampaign.xhtml
editCampaign.add_new_campaign=Neue Aktion anlegen
editCampaign.edit_campaign=Aktionsdaten editieren
editCampaign.general=Allgemein
editCampaign.name=Name
editCampaign.campaign_name_validation=Der Name einer Aktion muss min. 4 und darf max. 30 Zeichen lang sein.
editCampaign.name_of_the_campaign=Name der Spendenaktion
editCampaign.target_amount=Spendenziel
editCampaign.target_amount_validation=Das Spendenziel für die Aktion muss min. 10 Euro sein.
editCampaign.donation_amount=Spendenbetrag
editCampaign.donation_amount_validation=Der Spendenbetrag muss min. 1 Euro sein.
editCampaign.bank_account=Bankverbindung
editCampaign.iban=IBAN
editCampaign.name_of_bank=Name der Bank
editCampaign.save=Speichern
editCampaign.cancel=Abbrechen
Listing 8-3 shows the implementation of the Facelet.
<html xmlns="http://www.w3.org/1999/xhtml"
	xmlns:ui="http://xmlns.jcp.org/jsf/facelets"
	xmlns:f="http://xmlns.jcp.org/jsf/core"
	xmlns:h="http://xmlns.jcp.org/jsf/html">
<body>
	<f:view contracts="#{view.locale.language}">
		<ui:composition template="/template.xhtml">
			<ui:define name="content">
				<h1>#{campaignProducer.addMode ?
					msg['editCampaign.add_new_campaign'] :
					msg['editCampaign.edit_campaign']}</h1>
				<h:form>
					<h:panelGrid columns="3">
						<f:facet name="header">
							#{msg['editCampaign.general']}
						</f:facet>
						<h:outputLabel value="#{msg['editCampaign.name']}:">
						</h:outputLabel>
						<h:inputText id="a_name"
							value="#{campaignProducer.selectedCampaign.name}"
							validatorMessage=
								"#{msg['editCampaign.campaign_name_validation']}">
							<f:passThroughAttribute name="placeholder"
								value=
									"#{msg['editCampaign.name_of_the_campaign']}"
							/>
							<f:validateRequired />
							<f:validateLength minimum="4" maximum="30" />
						</h:inputText>
						<h:message for="a_name" style="color: red;" />
						<h:outputLabel value=
							"#{msg['editCampaign.target_amount']}:">
						</h:outputLabel>
						<h:panelGroup>
							<h:inputText id="a_targetAmount"
								value=
									"#{campaignProducer
										.selectedCampaign.targetAmount}"
								validatorMessage=
									"#{msg['editCampaign.target_amount_validation']}">
								<f:convertNumber maxFractionDigits="2"
									minFractionDigits="2" />
								<f:validateRequired />
								<f:validateDoubleRange minimum="10.0" />
							</h:inputText> EUR
						</h:panelGroup>
						<h:message for="a_targetAmount" style="color: red;" />
						<h:outputLabel value=
							"#{msg['editCampaign.donation_amount']}:">
						</h:outputLabel>
						<h:panelGroup>
							<h:inputText id="a_donationMinimum"
								value=	"#{campaignProducer
									.selectedCampaign.donationMinimum}"
								validatorMessage=
									"#{msg['editCampaign.donation_amount_validation']}">
								<f:convertNumber maxFractionDigits="2"
									minFractionDigits="2" />
								<f:validateRequired />
								<f:validateDoubleRange minimum="1.0" />
							</h:inputText> EUR
						</h:panelGroup>
						<h:message for="a_donationMinimum"
							style="color: red;" />
					</h:panelGrid>
					<h:panelGrid columns="3">
						<f:facet name="header">
							#{msg['editCampaign.bank_account']}
						</f:facet>
						<h:outputLabel value=
							"#{msg['editCampaign.name']}:">
						</h:outputLabel>
						<h:inputText id="b_name"
							value=
								"#{campaignProducer
									.selectedCampaign.account.name}">
							<f:validateRequired />
						</h:inputText>
						<h:message for="b_name" style="color: red;" />
						<h:outputLabel value=
							"#{msg['editCampaign.iban']}:">
						</h:outputLabel>
						<h:inputText id="b_iban"
							value=	"#{campaignProducer
										.selectedCampaign.account.iban}">
							<f:validateRequired />
						</h:inputText>
						<h:message for="b_iban" style="color: red;" />
						<h:outputLabel value=
							"#{msg['editCampaign.name_of_bank']}:">
						</h:outputLabel>
						<h:inputText id="b_name_bank"
							value=	"#{campaignProducer
										.selectedCampaign.account.nameOfBank}">
							<f:validateRequired />
						</h:inputText>
						<h:message for="b_name_bank" style="color: red;" />
					</h:panelGrid>
					<h:commandButton value="#{msg['editCampaign.save']}"
						action="#{editCampaignController.doSave}" />
					<h:commandButton value="#{msg['editCampaign.cancel']}"
						immediate="true" action=
							"#{editCampaignController.doCancel}" />
				</h:form>
			</ui:define>
		</ui:composition>
	</f:view>
</body>
</html>
Listing 8-3 Facelet editCampaign.xhtml
As with previous Facelets, we will save the file editCampaign.xhtml in our project structure in the directory src\main\webapp.
In the Facelet, we can easily recognize the binding of the attributes of the Campaign object to the input fields using EL expressions. The respective Campaign object is referenced in the EL expression via the selectedCampaign attribute of the CampaignProducer bean. The methods doSave and doCancel belonging to the controller class editCampaignController are registered with both buttons of the Facelet as action methods using EL expressions.
Adjusting the Existing Facelets and Classes
We have now created the Facelet and the controller for both use cases. All we are missing is integration with the use case Display and edit campaign. To do this, we must edit the class ListCampaignsController, which will reference the editCampaign.xhtml using the methods doEditCampaign and doAddCampaign. In both methods, the relevant campaign (a new campaign, or one selected by the user) and the processing mode must be set. We therefore require a reference to the CampaignProducer bean. To create this, we will declare an instance variable of the type CampaignProducer in the ListCampaignsController class and provide it with the annotation @Inject. This causes the application server to provide a bean for the desired reference at runtime.
@Inject
private CampaignProducer campaignProducer;
We must not forget to add the import command for the annotation @Inject and class CampaignProducer.
import javax.inject.Inject;
import press.turngeek.mycampaign.data.CampaignProducer;
We will now use this reference in the methods doEditCampaign and doAddCampaign to implement the logic. We can suppress the logging to standard output using System.out.println.
...
public String doAddCampaign() {
	campaignProducer.prepareAddCampaign();
	return Pages.EDIT_CAMPAIGN;
}
public String doEditCampaign(Campaign campaign) {
	campaignProducer.prepareEditCampaign(campaign);
	return Pages.EDIT_CAMPAIGN;
}
...
When editing an existing campaign, the Campaign object to be edited is passed as an argument. When creating a campaign, a new object is created in the prepareAddCampaign method of the CampaignProducer class.
The use cases Edit campaign and Create new campaign can now be run. Try them out for yourself! Please don’t forget that WildFly must be started and that we must redeploy the most recent version of the project with Maven. For comparison purposes, Fig. 8-1 shows the view that should appear for adding a new campaign. You can see the inline label in the Name input field.

Fig. 8-1 View for creating a new campaign
At this point, it’s essential for us to see how the page behaves when an input is entered incorrectly. In order to receive an error message, we will simply leave the input fields empty and click on the Save button. The result is shown in Fig. 8-2. Firstly, we see the standard error message (j_idt8:*). Secondly, we see the error messages that we set explicitly via the validatorMessage attribute when creating the text inputs (<h:inputText>). Naturally, the error messages are shown in the language set in the browser.
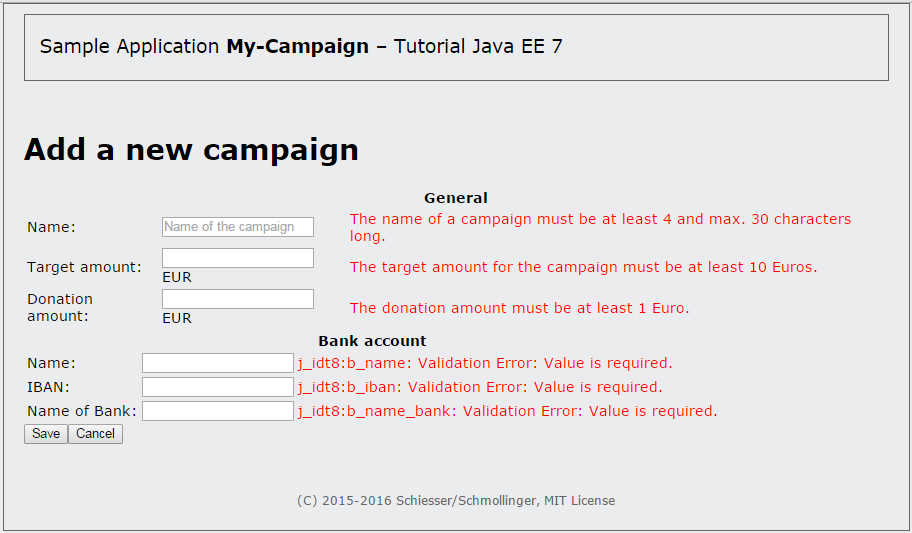
Fig. 8-2 The form for creating a new campaign, with error messages
8.2 Displaying the List of Donations
With the next use case, Display list of donors, we want to see who has already donated to a campaign. If we look at our domain classes, we see the relationship between campaign and donation is particularly important for this use case. A campaign can have no donations or multiple donations and donations are managed as a list for each campaign. Let’s look first at the controller class and then the Facelet.
The ListDonationsController Controller Class
As laid out earlier, we only need a confirmation button on the page that will redirect the user back to the campaign list homepage when the button is pressed. This logic will be implemented in the doOk method.
package press.turngeek.mycampaign.controller;

import press.turngeek.mycampaign.model.Donation.Status;
import javax.enterprise.context.SessionScoped;
import javax.inject.Named;
import java.io.Serializable;

@SessionScoped
@Named
public class ListDonationsController implements Serializable {
	private static final long serialVersionUID = 437878972432L;

	public String doOk() {
		return Pages.LIST_CAMPAIGNS;
	}
}
Listing 8-4 ListDonationsController class
The listDonations.xhtml Facelet
For the implementation of this Facelet, we will refer to the Facelet listCampaigns.xhtml in Listing 6-4, since it also presents data from a list in tabular form. Here, again, we will use the h:dataTable tag within the form (see Listing 8-5). Before that, we will modify our two properties files as we’ve become accustomed to doing. The file messages_en.properties will be supplemented with the following rows:
# listDonations.xhtml
listDonations.donation_list=List of donations
listDonations.beneficiary_account=Beneficiary account
listDonations.iban=IBAN
listDonations.name=Name
listDonations.name_of_bank=Name of Bank
listDonations.donation_amount=Donation amount
listDonations.receipt=Receipt
listDonations.yes=yes
listDonations.no=no
listDonations.status=Status
listDonations.status.TRANSFERRED=transferred
listDonations.status.IN_PROCESS=in process
We will then add the corresponding German terms to the messages_de.properties file:
# listDonations.xhtml
listDonations.donation_list=Spenderliste
listDonations.beneficiary_account=Empfängerkonto
listDonations.iban=IBAN
listDonations.name=Name
listDonations.name_of_bank=Name der Bank
listDonations.donation_amount=Spendenbetrag
listDonations.receipt=Quittung
listDonations.yes=ja
listDonations.no=nein
listDonations.status=Status
listDonations.status.TRANSFERRED=überwiesen
listDonations.status.IN_PROCESS=in Bearbeitung
We can now proceed with the implementation of the Facelet listDonations.xhtml:
<html xmlns="http://www.w3.org/1999/xhtml"
	xmlns:ui="http://xmlns.jcp.org/jsf/facelets"
	xmlns:f="http://xmlns.jcp.org/jsf/core"
	xmlns:h="http://xmlns.jcp.org/jsf/html">
<body>
	<f:view contracts="#{view.locale.language}">
		<ui:composition template="/template.xhtml">
			<ui:define name="content">
				<h1>#{msg['listDonations.donation_list']}
					'#{campaignProducer.selectedCampaign.name}'
				</h1>
				<h2>#{msg['listDonations.beneficiary_account']}:
					#{campaignProducer.selectedCampaign.account.name},
					#{msg['listDonations.iban']}:
					#{campaignProducer.selectedCampaign.account.iban},
					#{campaignProducer
						.selectedCampaign.account.nameOfBank}
				</h2>
				<h:form>
					<h:dataTable value=
							"#{campaignProducer.selectedCampaign.donations}"
						var="donation">
						<h:column>
							<f:facet name="header">
								#{msg['listDonations.name']}
							</f:facet>
							<h:outputText value="#{donation.donorName}" />
						</h:column>
						<h:column>
							<f:facet name="header">
								#{msg['listDonations.iban']}
							</f:facet>
							<h:outputText value="#{donation.account.iban}" />
						</h:column>
						<h:column>
							<f:facet name="header">
								#{msg['listDonations.name_of_bank']}
							</f:facet>
							<h:outputText value=
								"#{donation.account.nameOfBank}" />
						</h:column>
						<h:column>
							<f:facet name="header">
								#{msg['listDonations.donation_amount']}
							</f:facet>
							<h:outputText value="#{donation.amount}">
								<f:convertNumber type="currency"
									currencyCode="EUR" />
							</h:outputText>
						</h:column>
						<h:column>
							<f:facet name="header">
								#{msg['listDonations.receipt']}
							</f:facet>
							<h:outputText value=
								"#{donation.receiptRequested ?
									msg['listDonations.yes']
										: msg['listDonations.no']}" />
						</h:column>
						<h:column>
							<f:facet name="header">
								#{msg['listDonations.status']}
							</f:facet>
							<h:outputText value=
									"#{msg['listDonations.status.TRANSFERRED']}"
								rendered="#{donation.status == 'TRANSFERRED'}" />
							<h:outputText value=
									"#{msg['listDonations.status.IN_PROCESS']}"
								rendered="#{donation.status == 'IN_PROCESS'}" />
						</h:column>
					</h:dataTable>
					<h:commandButton value="OK"
						action="#{listDonationsController.doOk}" />
				</h:form>
			</ui:define>
		</ui:composition>
	</f:view>
</body>
</html>
Listing 8-5 Facelet listDonations.xhtml
Most of the tags used have already been explained in the context of understanding the list of campaigns, so we can refrain from giving a fresh explanation here. The following two constructs however, are new:
<h:outputText value="#{donation.receiptRequested ?
			msg['listDonations.yes']: msg['listDonations.no']}" />
Here, the conditional operator used in the EL expression should be well-known to the reader from the Java programming language. The value taken by the value attribute of the <h:outputText> tag is determined depending on a boolean expression. The boolean expression is placed before the question mark and, in our case, is implemented by the receiptRequested attribute of type boolean belonging to the class Donation. If the value is true, the value after the question mark and up to the colon is used; if not, the value after the colon is used. With regards to content, this is an elegant way to display whether or not a donation receipt is required.
The second construct also makes use of the expressive power of the expression language:
<h:outputText value=#{msg['listDonations.status.TRANSFERRED']}"
			rendered="#{donation.status == 'TRANSFERRED'}" />
<h:outputText value="#{msg['listDonations.status.IN_PROCESS']}"
			rendered="#{donation.status == 'IN_PROCESS'}" />
The rendered attribute of the <h:outputText> tag expects a boolean value and uses it to control the display. The text will be displayed only if the value is set to true. For the attribute’s value, we use an EL expression that contains a comparison operation to check which status is set in the donation to be displayed. Only one of the comparisons can ever be successful, with the result that only one of the texts can actually be displayed.
Adjusting the Existing Classes
The ListDonationsController bean requires the selected Campaign object, which should have been stored in the CampaignProducer beforehand.
This must occur in the doListDonations method of the ListCampaignsController class, since this is where the selected Campaign object is passed as an argument.
In this method, therefore, we once again require a reference to the CampaignProducer bean to enable us to pass it the chosen campaign. The doListDonations method of the ListCampaignsController class can be implemented as follows:
public String doListDonations(Campaign campaign) {
	campaignProducer.setSelectedCampaign(campaign);
	return Pages.LIST_DONATIONS;
}
Nothing more needs to be adjusted. We can try out the newly implemented use case immediately following the obligatory Maven build. As an example, Fig.4-5 shows the list of donors for the first campaign. The donations are represented in tabular form as desired (tag <h:dataTable>).
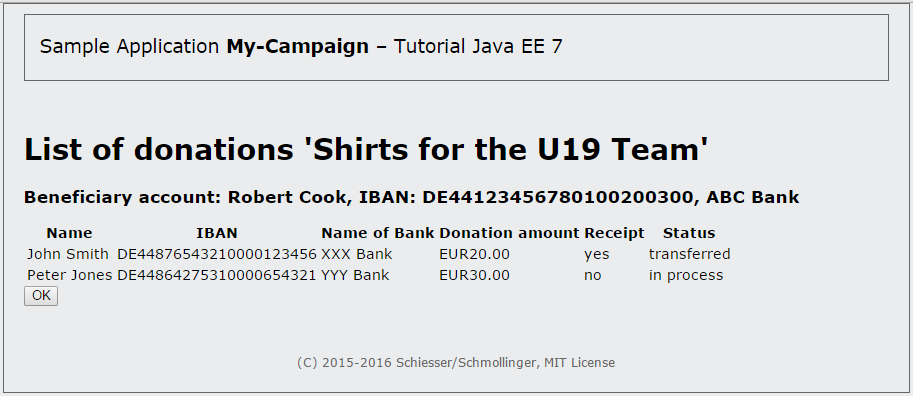
Fig. 8-3 View of the donor list for the campaign “Shirts for the U19 Team”
8.3 Editing a Donation Form
We’ll now look at the use case Edit donation form. This use case should enable the user to manage the address (URL) of the donation form and a number of settings pertaining to how it is displayed. The background color and the color of the text can be adjusted for the form and are included in the address as HTTP GET parameters. We will begin by re-implementing the controller. Once this is done, we’ll move to the Facelet.
The EditDonationFormController Class
The controller bean manages the corresponding campaign and the previously-named properties: address (url), background color (bgColor) and text color (textColor). The URL is dynamically created from the other properties. Leaving out the color properties and the campaign ID (campaignId), we will first hard-code the URL. The values of the properties will be encoded in the HTTP GET request – which is specified by the URL – as values of the request parameters bgColor, textColor and campaignId.
The class in Listing 8-6 has the usual getter and setter methods and requires access to the chosen campaign in order to generate the URL. This access is obtained once again via the CampaignProducer bean, which we will inject in the controller for this purpose. In line with the description of the use case, only one confirmation button is required in the view. The logic will be implemented in the controller using the method doOk(), at which point nothing else happens except the redirection of the user back to the list of campaigns.
package press.turngeek.mycampaign.controller;

import press.turngeek.mycampaign.data.CampaignProducer;
import javax.enterprise.context.SessionScoped;
import javax.faces.context.FacesContext;
import javax.inject.Inject;
import javax.inject.Named;
import javax.servlet.http.HttpServletRequest;
import java.io.Serializable;

@SessionScoped
@Named
public class EditDonationFormController implements Serializable {
	private static final long serialVersionUID = -4210085664588144340L;
	private String textColor = "000000";
	private String bgColor = "ffffff";
	@Inject
	private CampaignProducer campaignProducer;

	public String doOk() {
		return Pages.LIST_CAMPAIGNS;
	}
	public String getUrl() {
		return "http://localhost:8080/my-campaign/donateMoney.jsf?bgColor="
				+ bgColor + "&textColor=" + textColor + "&campaignId="
				+ campaignProducer.getSelectedCampaign().getId();
	}
	public String getTextColor() {
		return textColor;
	}
	public void setTextColor(String textColor) {
		this.textColor = textColor;
	}
	public String getBgColor() {
		return bgColor;
	}
	public void setBgColor(String bgColor) {
		this.bgColor = bgColor;
	}
}
Listing 8-6 EditDonationFormController class
The editDonationForm.xhtml Facelet
Next, we will determine the language-dependent text for the Facelet. To do this, we insert the following lines in the properties file messages_en.properties:
# editDonationForm.xhtml
editDonationForm.edit_donation_form=Edit donation form
editDonationForm.background_color=Background color
editDonationForm.text_color=Text color
editDonationForm.form_url=Form URL
The properties file messages_de.properties should then be supplemented with the following entries:
# editDonationForm.xhtml
editDonationForm.edit_donation_form=Spendenformular bearbeiten
editDonationForm.background_color=Hintergrundfarbe
editDonationForm.text_color=Textfarbe
editDonationForm.form_url=URL des Formulars
Listing 8-7 shows the implementation of the Facelet for editing the properties of the donation form.
<html xmlns="http://www.w3.org/1999/xhtml"
	xmlns:ui="http://xmlns.jcp.org/jsf/facelets"
	xmlns:f="http://xmlns.jcp.org/jsf/core"
	xmlns:h="http://xmlns.jcp.org/jsf/html">
<body>
	<f:view contracts="#{view.locale.language}">
		<ui:composition template="/template.xhtml">
			<ui:define name="content">
				<h1>#{msg['editDonationForm.edit_donation_form']}</h1>
				<h:form>
					<h:panelGrid columns="2">
						<h:outputLabel
							value=
								"#{msg['editDonationForm.background_color']}:">
						</h:outputLabel>
						<h:selectOneMenu id="bgColor"
								value="#{editDonationFormController.bgColor}">
							<f:selectItem itemLabel="#FFFFFF"
								itemValue="FFFFFF" />
							<f:selectItem itemLabel="#000000"
								itemValue="000000" />
							<f:selectItem itemLabel="#FF0000"
								itemValue="FF0000" />
							<f:ajax render="url" />
						</h:selectOneMenu>
						<h:outputLabel value=
							"#{msg['editDonationForm.text_color']}:">
						</h:outputLabel>
						<h:selectOneMenu id="textColor"
							value="#{editDonationFormController.textColor}">
							<f:selectItem itemLabel="#FFFFFF"
								itemValue="FFFFFF" />
							<f:selectItem itemLabel="#000000"
								itemValue="000000" />
							<f:selectItem itemLabel="#FF0000"
								itemValue="FF0000" />
							<f:ajax render="url" />
						</h:selectOneMenu>
						<h:outputLabel value=
							"#{msg['editDonationForm.form_url']}:">
						</h:outputLabel>
						<h:inputTextarea id="url" rows="6"
							cols="30" readonly="true"
							value="#{editDonationFormController.url}" />
					</h:panelGrid>
					<h:commandButton value="OK"
						action="#{editDonationFormController.doOk}" />
				</h:form>
			</ui:define>
		</ui:composition>
	</f:view>
</body>
</html>
Listing 8-7 Facelet editDonationForm.xhtml
The Facelet presents data in tabular form using the <h:panelGrid> tag. The table has two columns. The first column contains the names of the fields (tag <h:outputText>), while the second contains the input components. For the colors, a combo box is used as a choice component (tag <h:selectOneMenu>). The URL is displayed in a text area (tag <h:textArea>) that cannot be changed manually (attribute readonly="true"). As explained earlier, we use the <f:ajax> tag within the color choice component to automatically adjust the URL in the text area in the event of a color change without having to reload the whole page. At the end of the form is the confirmation button (tag <h:commandButton>) that activates the controller method doOk. Notice here that the use of a combo box for color selection is suboptimal, because the colors must be selected by means of a Hexcode. A better option would be a choice component in which a range of colors are displayed for the user to choose from. A component like this, which is often referred to as a color picker, does not exist in the JSF standard. However, the extension PrimeFaces, which we’ll look at in chapter 10, can help us in this regard.
Adjust the Existing Classes
As with the previous use case, the editing of the donation form is dependent on the selected campaign. The selected campaign is stored in the CampaignProducer bean. This means that we need to adjust the controller class ListCampaignsController. We must modify the method doEditDonationForm in such a way that the selected campaign is set in the CampaignProducer bean.
public String doEditDonationForm(Campaign campaign) {
	campaignProducer.setSelectedCampaign(campaign);
	return Pages.EDIT_DONATION_FORM;
}
Following the obligatory re-run of our WildFly runner, we can now try out our newly implemented use case. Fig. 8-4 shows our screen for editing the donation form. Features we see here include the combo box choice component (tag <h:selectOneMenu>), the text area (tag <h:textarea>) and a button for submitting the form (tag <h:commandButton>). At this point, we should briefly test out the Ajax functionality. To do this, change one of the choices in a combo box. The URL in the text area should adjust automatically to reflect the new value.
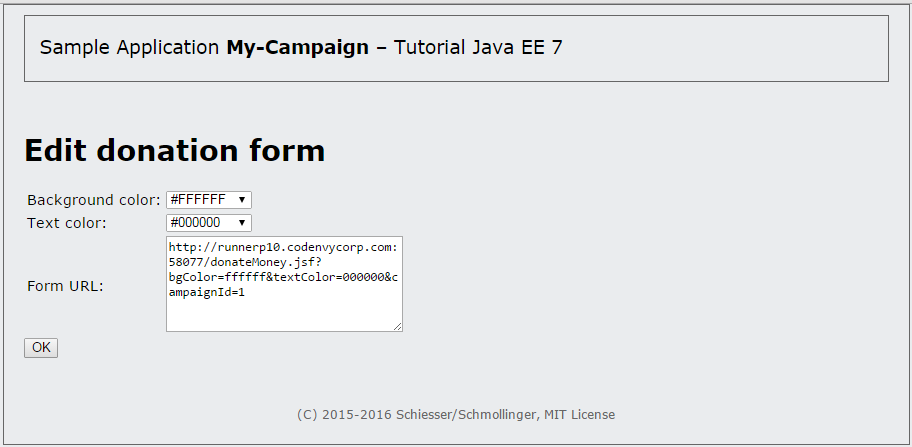
Fig. 8-4 Screen for editing a donation form
Generating the Form URL
The controller EditDonationFormController supplies the URL using the method getUrl().
public String getUrl() {
		return "http://localhost:8080/my-campaign/donateMoney.jsf?bgColor="
				+ bgColor + "&textColor=" + textColor + "&campaignId="
				+ campaignProducer.getSelectedCampaign().getId();
	}
We can see that the URL is specified in the program code. The hard-coded address only works if the browser and server are run on the same computer and the web context (name of the web application) is set to my-campaign. In a real-world environment, however, this is almost never the case. We must alter the method in such a way that it generates the URL automatically with the correct protocol, host, port and web context. We can read this information from the current request. To obtain it, we must descend a little into the depths of the Java EE APIs. The class representing an HTTP request in Java EE is the javax.servlet.http.HttpServletRequest class of the Servlet API. Access to the current instance can be obtained once again via the FacesContext.
The URL is generated using two methods. The private method getAppUrl determines the URL of the web application, then the public method getUrl uses this and amends the address with the Facelet name and the parameters.
private String getAppUrl() {
	HttpServletRequest req = (HttpServletRequest) FacesContext
			.getCurrentInstance().getExternalContext().getRequest();
	String scheme = req.getScheme();
	String serverName = req.getServerName();
	int serverPort = req.getServerPort();
	String contextPath = req.getContextPath();
	return scheme + "://" + serverName + ":" + serverPort + contextPath;
}

public String getUrl() {
	return getAppUrl() + "/" + Pages.DONATE_MONEY + ".jsf" + "?bgColor="
			+ bgColor + "&textColor=" + textColor + "&campaignId="
			+ campaignProducer.getSelectedCampaign().getId();
}
We obtain a reference to the current instance of the HttpServletRequest class via the current instance of the FacesContext class. This offers us a range of methods for retrieving information from the request. The object also contains all the information for the URL, and we take advantage of this for the automatic generation of the donation form URL. We supplement this information with the name of the Facelet from the Pages class and append the current color values and the ID of the campaign as GET parameters. Once we’ve done this, the URL will always adjust itself automatically to the execution environment and the deployment of the application.
8.4 Donating Money
The implementation of the use case Donate money differs somewhat from the other implementations. This use case is the only one that is not used by the organizer themselves, but by a random group of Internet users. Therefore, the Facelet is not embedded in our template, but rather defines its own page. The organizer of a campaign can send the URL of the “Donate money” page to potential donors, allowing them to use it. Contained in the URL as HTTP GET parameters are the text and background color for the donation form and the ID of the campaign to be donated to. These data must be interpreted in the Facelet and the page displayed accordingly.
Even though this case is slightly different, we still require a controller behind the Facelet to manage the Donation object and to save the donation for the campaign after it has been sent. Since the use case is initiated by the user via the URL, the controller does not afford us access to the Campaign object associated with the donation. Without the persistence layer, assignment of the campaignId to a Campaign object is only possible with great effort. We will revisit and solve this in an upcoming Cloud Tutorial with the help of JPA. The controller can then read the campaign from the database to add the donation and write both back into the database. Until then, however, we will live with the fact that the donation is not saved when the Donate button is clicked, and is therefore lost.
The DonateMoneyController Controller Class
In the DonateMoneyController class from Listing 8-8, we require access to the JSF API classes FacesContext and FacesMessage to be able to dispay a donation confirmation message to the user. The current FacesContext also allows us to obtain the correct ResourceBundle, which we require for displaying the message in the correct language. A FacesMessage is created for this purpose in the method doDonation and is stored in the current FacesContext. JSF uses this to display the thank you message to the user following the execution of doDonation and the rebuilding of the page.
package press.turngeek.mycampaign.controller;

import press.turngeek.mycampaign.model.Donation;
import javax.enterprise.context.SessionScoped;
import javax.faces.application.FacesMessage;
import javax.faces.context.FacesContext;
import javax.inject.Named;
import java.io.Serializable;
import java.text.MessageFormat;
import java.util.ResourceBundle;

@SessionScoped
@Named
public class DonateMoneyController implements Serializable {
	private static final long serialVersionUID = 5493038842003809106L;
	private String textColor = "000000";
	private String bgColor = "ffffff";
	private Long campaignId;
	private Donation donation;

	public DonateMoneyController() {
		this.donation = new Donation();
	}
	public Long getCampaignId() {
		return campaignId;
	}
	public void setCampaignId(Long campaignId) {
		this.campaignId = campaignId;
	}
	public Donation getDonation() {
		return donation;
	}
	public void setDonation(Donation donation) {
		this.donation = donation;
	}
	public String getTextColor() {
		return textColor;
	}
	public void setTextColor(String textColor) {
		this.textColor = textColor;
	}
	public String getBgColor() {
		return bgColor;
	}
	public void setBgColor(String bgColor) {
		this.bgColor = bgColor;
	}
	public String doDonation() {
		final FacesContext facesContext = FacesContext.getCurrentInstance();
		final ResourceBundle resourceBundle = facesContext.getApplication()
				.getResourceBundle(facesContext, "msg");
		final String msg = resourceBundle.getString("donateMoney.thank_you");
		facesContext.addMessage(null, new FacesMessage(
				FacesMessage.SEVERITY_INFO, msg, null));
		this.donation = new Donation();
		return Pages.DONATE_MONEY;
	}
}
Listing 8-8 DonateMoneyController class
The donateMoney.xhtml Facelet
Like the previous Facelets, the donateMoney.xhtml Facelet requires a number of language-dependent messages and texts. Therefore, before we look at the Facelet itself, we need to adjust our properties file. We will add the following lines of code to the file messages_en.properties:
# donateMoney.xhtml
donateMoney.donate_money=Donate money
donateMoney.name=Name
donateMoney.iban=IBAN
donateMoney.name_of_bank=Name of bank
donateMoney.donation_amount=Donation amount
donateMoney.i_want_a_receipt=Yes, I would like a donation receipt
donateMoney.donate=Donate
donateMoney.thank_you=Thank you for your donation!
In addition to the above, we will insert the following lines of code in the messages_de.properties file:
# donateMoney.xhtml
donateMoney.donate_money=Geld spenden
donateMoney.name=Name
donateMoney.iban=IBAN
donateMoney.name_of_bank=Name der Bank
donateMoney.donation_amount=Spendenbetrag
donateMoney.i_want_a_receipt=Ja, ich möchte eine Spendenquittung
donateMoney.donate=Spenden
donateMoney.thank_you=Vielen Dank für die Spende!
At the beginning of the donateMoney.xhtml Facelet in Listing 8-9, the GET parameters of the HTTP request are read out, validated and bound to the properties of the controller bean. Directly afterwards, the color values supplied by the controller are used in the style attribute of the <body> HTML tag to take care of the desired color scheme for the display. After the <h1> title in each of the languages, there is a section with error messages. First come the global messages (<h:messages globalOnly="true"/>), then the <h:message> tags for validation of the view parameter. The rest of the Facelet contains components we already know:
<!DOCTYPE html>
<html xmlns="http://www.w3.org/1999/xhtml"
	xmlns:h="http://xmlns.jcp.org/jsf/html"
	xmlns:f="http://xmlns.jcp.org/jsf/core">
<h:head>
	<title>#{msg['donateMoney.donate_money']}</title>
	<meta charset="utf-8" />
	<f:metadata>
		<f:viewParam id="bgColor" name="bgColor"
			value="#{donateMoneyController.bgColor}">
			<f:validateRegex pattern="[A-Fa-f0-9]{6}" />
		</f:viewParam>
		<f:viewParam id="textColor" name="textColor"
			value="#{donateMoneyController.textColor}">
			<f:validateRegex pattern="[A-Fa-f0-9]{6}" />
		</f:viewParam>
		<f:viewParam id="campaignId" name="campaignId"
			converter="javax.faces.Long"
			value="#{donateMoneyController.campaignId}">
		</f:viewParam>
	</f:metadata>
</h:head>
<h:body style="margin:0;
		font-family: Verdana, sans-serif;
		font-size: 0.9em;
		background-color: ##{donateMoneyController.bgColor};
		color: ##{donateMoneyController.textColor}">
	<h1>#{msg['donateMoney.donate_money']}</h1>
	<h:messages globalOnly="true" />
	<h:message for="bgColor" style="color: red;" />
	<h:message for="textColor" style="color: red;" />
	<h:message for="campaignId" style="color: red;" />
	<h:form>
		<h:panelGrid columns="3">
			<h:outputLabel value="#{msg['donateMoney.name']}:">
			</h:outputLabel>
			<h:inputText id="name"
					value="#{donateMoneyController.donation.donorName}">
				<f:validateRequired />
			</h:inputText>
			<h:message for="name" style="color: red;" />
			<h:outputLabel value="#{msg['donateMoney.iban']}:">
			</h:outputLabel>
			<h:inputText id="iban"
					value="#{donateMoneyController.donation.account.iban}">
				<f:validateRequired />
			</h:inputText>
			<h:message for="iban" style="color: red;" />
			<h:outputLabel value="#{msg['donateMoney.name_of_bank']}:">
			</h:outputLabel>
			<h:inputText id="name_bank"
				value="#{donateMoneyController.donation.account.nameOfBank}">
				<f:validateRequired />
			</h:inputText>
			<h:message for="name_bank" style="color: red;" />
			<h:outputLabel value="#{msg['donateMoney.donation_amount']}:">
			</h:outputLabel>
			<h:panelGroup>
				<h:inputText id="donationAmount"
						value="#{donateMoneyController.donation.amount}">
					<f:validateRequired />
					<f:convertNumber maxFractionDigits="2"
						minFractionDigits="2" />
				</h:inputText> EUR
			</h:panelGroup>
			<h:message for="donationAmount" style="color: red;" />
		</h:panelGrid>
		<h:selectBooleanCheckbox
			value="#{donateMoneyController.donation.receiptRequested}" />
			#{msg['donateMoney.i_want_a_receipt']}<br />
		<h:commandButton value="#{msg['donateMoney.donate']}"
			action="#{donateMoneyController.doDonation}" />
	</h:form>
</h:body>
</html>
Listing 8-9 Facelet donateMoney.xhtml
We do not have to make any adjustments to the already-programmed Facelets and classes. Again, we can try out the newly implemented use case directly after the obligatory Maven build. In order to obtain a donation form for a campaign in the browser, we must enter the URL from the form Edit donation form (see Fig. 8-4 ) into the browser. As an example, Fig. 8-5 shows the form for the first campaign on the list. We have already filled out the form and clicked the button Donate.
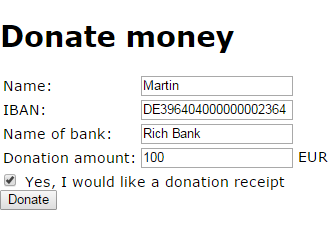
Fig. 8-5 Filled-out donation form
The page is reloaded and now displays the message generated by the controller (FacesMessage) underneath the title Donate money (see Fig. 8-6).
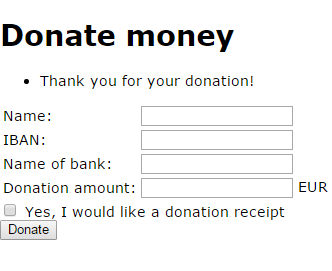
Fig. 8-6 Response page with the FacesMessage after submitting a completed donation form
Discussion
Use the message board below to give the authors your feedback or to discuss this page’s topic with other readers (in English please!). Please don’t expect the authors to answer directly, but they might update the content of this site according to your feedback.